


Eating seasonal is high on our agenda and one such recipe I blog today is all about Winter Produce - Presenting NoolKol Kootu also known as Knol Khol or Kohlrabi Kootu. A No Onion No Garlic Side Dish to your Mains.
Noolkol is a turnip like vegetable, loaded with water, easy to cook, nutritious and extremely delicious. Although, I love making sabzis, stir fry or poriyals with Kohlrabi, making Kootu is my number one choice with Noolkol.
Kootu is a South Indian gravy or curry recipe that can be made with any seasonal vegetables and / or mix vegetables available in your refrigerator. Vegetables + Lentils and a coconut gravy is what makes this dish, truly delicious and filling. I can basically have a bowl of Kootu as my dinner and not miss the carbs.
Kootu can be that humble one pot vegetable or a side to your lazy lavish Sunday meals. The best part is that it can be made with any available vegetables in your refrigerator. Common Vegetables like Potato, Peas, Carrot, Capsicum etc are always available in your refrigerator / pantry.
Note - If you are using Peas, Carrot and Capsicum - Just Steam the vegetables instead of pressure cooking or boiling in an open vessel to keep nutrients intact and avoid overcooking.
Making Kootu is an easy process so it makes an excellent dish when guests are visiting home on a short notice and/or you are in a hurry early morning to make lunch box. Just throw in some vegetables along with lentils in a pressure cooker and in the meanwhile, prep the gravy. A quick process of grinding, mixing and tempering, the Kootu is ready to pack or serve.
NoolKol Kootu makes a great side for your main course and also for Indian Breads like Rotis or Parathas. Heck, we love eating the leftover Kootu with Adai or Dosai too the next day as breakfast.
Some Kootu Recipes on the Blog
- Vazhaithandu Kootu - Delicious and healthy Banana Stem Curry that can be eaten as Main Course Veg with Rice and a Gravy like Keerai Molagootal or Sambar.
- Cabbage Kootu - A must try Kootu recipe with Cabbage. This recipe will be even loved by the ones who are put off by the smell of cabbage. Tastes best with Pineapple Rasam and Rice.
- Avarakkai Kootu (Broad Beans) - One of our family favourite Kootu recipes that tastes best with a side of Jeera Milagu Rasam and steamed rice. Papad is mandatory.
If you like to enjoy Kootu minus the Coconut gravy then you can try this Kootu or Dal recipe that is made with just Sorakkai or Bottle Gourd and Lentils. I have added a bit of Sambar Powder to give it an extra oomph. This makes a hearty thick soup as dinner for us at home during winters and rainy season.
I have been making this Noolkol or Knol Khol Kootu regulary as part of husbands lunch box for work with a side of dry sabzi. Since I share the lunch box photographs on my Instagram account, few approached me for the recipe, which led me to blogging about this today.


Step by Step Noolkol Kootu / Knol Khol Kootu / Kohlrabi Kootu Recipe
(1) Soak 1/2 cup (125 ml) lentils or yellow moong dal in water for atleast 15 mins prior to pressure cooking.
(2) Wash, peel and roughly chop Noolkol into thick chunks (easier to pressure cook and will not turn mushy)


(3) Now pressure cook the noolkol and the lentils with enough water along with turmeric powder.


(4) While the vegetables and lentils are pressure cooking, we will prep for the coconut gravy.
(5) Heat a small pan or kadhai, add coconut oil along with Urad dal, Whole red chillies, Jeera and cumin seeds. Saute this until the urad dal turns brown.
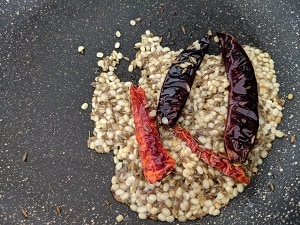
(6) To this, add grated coconut and saute for a few seconds. Remove the pan from heat and allow it to cool completely before grinding with 3/4th cup of water into a thick gravy.


(7) The lentils and NoolKol have cooked so time to make the Kootu.
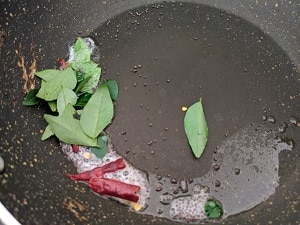
(8) Heat a kadhai, add 2 tsps of Coconut oil, whole red chillies, mustard seeds and curry leaves. Once the mustard crackles, add the cooked lentils + Noolkol and the coconut gravy.

(9) Add salt to taste and mix everything together. The Kootu will be very thick so add some water to adjust consistency. Check for salt and add extra, if required.

(10) Simmer for a few seconds only and then switch off the flame, serve it piping hot with rice or chapati.
Recipe Notes
- I have used 2 varieties of Whole red chillies - Madras Red Chillies and Pondi Chillies. You can use any variety of chillies available. If you add Kashmiri or Byadgi chillies, then the Kootu colour would be more red or dark orange.
- If you have no time to soak lentils or are in a hurry, pressure cook extra one whistle.
- Instead of Yellow Moong Dal, you can use Arhar Dal or Toovar Dal too. Or you can mix both and add as well. Add more dal too, if required. You can go up to 3/4th cup for this recipe.
- The recipe is Vegan but not Gluten Free as I have added asafoetida or hing in the tempering. You can skip that, if you like.
- Always simmer Kootu on low heat. No frothing or boiling absolutely. It tends to spoil the taste.
- If you have leftover Kootu and want to use the next day, suggest only heating the portion required in the microwave.
- I like using Coconut Oil for coconut gravy based recipes as it elevates the taste and flavor both. You can, however, use any vegetable oil for this recipe too.
The consistency of most of my Kootu recipes is slightly thick as we both prefer it that way. It tastes creamy and feels like a thick chunky soup when you load it with vegetables and have it for dinner especially. You can, however adjust the consistency by adding water and required seasoning.

Keep the consistency of Kootu thick if you are serving it as side dish for chapati and / or phulkas so that it can easily be mopped up like any other gravy vegetable.
A bowl of Kootu keeps you fuller for longer, thanks to the vegetables and lentils or dal used. The shelf life of Kootu is couple of days in refrigerator. Honestly, I feel Kootu tastes amazing the next day after all the flavors have seeped in.


Noolkol Kootu / Knol Khol Kootu / Kohlrabi Kootu Recipe
Equipment
- Pressure Cooker
- Mixer Grinder
Ingredients
- 2 cups Noolkol, Knol Khol or Kohlrabi roughly chopped 1 cup is 200 gms measurement
- 1/2 cup Yellow Moong Dal 1/2 cup is 125 ml measurement
- 1/4 tsp Turmeric Powder or Haldi powder
- salt to taste
- Water as required to grind + adjust gravy consistency
- FOR THE COCONUT GRAVY
- 1/2 cup Grated Coconut 1/2 cup is 125 ml measurement
- 2 1/2 tsp Urad Dal
- 1 tsp Jeera or Cumin Seeds
- 3-4 nos. Whole Red Chillies
- 2 tsp Coconut Oil
- FOR TEMPERING
- 2 tsp Coconut Oil
- 1/4 tsp Mustard Seeds or Rai
- Few sprigs of curry leaves as required
- 1-2 nos. Whole Red Chillies Optional
- A Pinch of asafoetida or Hing skip this ingredient for gluten free recipe
Instructions
- Soak 1/2 cup (125 ml) lentils or yellow moong dal in water for atleast 15 mins prior to pressure cooking.
- Wash, peel and roughly chop Noolkol into thick chunks (easier to pressure cook and will not turn mushy)
- Now pressure cook the noolkol and the lentils with enough water along with turmeric powder.
- For the coconut gravy, heat a small pan or kadhai, add coconut oil along with Urad dal, Whole red chillies, Jeera and cumin seeds.
- Saute this until the urad dal turns brown. To this, add grated coconut and saute for a few seconds.
- Remove the pan from heat and allow it to cool completely before grinding with 3/4th cup of water into a thick gravy.
- Once the vegetable and lentils have cooked, heat a kadhai, add 2 tsps of Coconut oil, whole red chillies, mustard seeds and curry leaves along with a pinch of asafoetida or hing.
- Once the mustard crackles, add the cooked lentils + Noolkol and the coconut gravy. Add salt to taste and mix everything together.
- The Kootu will be very thick so add some water to adjust consistency. Check for salt and add extra, if required.
- Simmer for a few seconds only and then switch off the flame, serve it piping hot with rice or chapati.
Notes
Taking this recipe to the A to Z challenge this month wherein we choose to cook with key ingredients Alphabetically. This month it was time for Alphabet ‘K’ and I chose my key ingredient ‘Knol Khol or Kohlrabi’ to make a traditional South Indian Side Dish.

Do give us a shout out or tag us when you post a recipe on any of our social media handles – INSTAGRAM, TWITTER, FACEBOOK PAGE AND PINTEREST.
You can also subscribe to our website to receive all the delicious recipes in your mail box.
Would be really happy to receive your feedback.
Thank you for visiting
Vidya Narayan