
Step-wise recipe to bake Whole Wheat Garlic Pull Apart bread at home. Soft, Buttery bread loaded with herbs and garlic, your family will never get enough of these gorgeous rolls! Bake an extra batch if you want to save yourself a piece!

Garlic Pull Apart Bread Recipe made from scratch - An easy Savory Whole Wheat Bread loaded with fresh garlic, loads of herbs and butter. Served with soup or pasta, this is a perfect weekend treat for your family, potlucks and summer picnics.
Who doesn't love fresh Garlic Bread? My husband, for one, loses track of the number of pieces he consumes while the bread is still warm. I don't blame him as I cannot resist either.
The aroma of garlic and butter wafting in the kitchen while the bread is baking is enough to signal the taste buds and hungry tummies.
While this can be served with a bowl of soup or pasta for weeknights, this bread makes a great addition or vegetarian side for Thanksgiving Lunch / dinner with family.
This is the perfect bread recipe for beginners because it is easy and quite simple to begin with. Achieving that fluffy and soft bread texture with whole wheat flour, specifically Emmer Wheat Flour is quite possible.
The recipe is quite detailed and I have covered step-wise instructions and plenty of tips that will help even a novice baker.
Trust me, this is one of the best savory pull apart garlic bread recipe that your family will demand every other weekend.
Jump to:
Most recipes claim as Whole Wheat Bread and then you find some quantity of All Purpose flour or self raising flour along with milk powder and few other ingredients. Trust me, this is 100% Whole Wheat Pull Apart Garlic Bread without any Vital Gluten and does not use a stand mixer either.
If you are a beginner in bread baking, I would suggest kneading with hands as it helps you understand the behavior of flour and water.

Ingredients
Whole Wheat Flour - I have used Emmer Wheat Flour also known as "Khapli Wheat". It is an heirloom wheat variety, also low in Gluten.
You can bake this bread using All Purpose Flour or regular wheat flour that you use for making Indian Breads like Roti, Chapati and Paratha.
Instant Yeast - While instant yeast can be added directly into the flour and doesn't require to be proofed separately. However, time and again, it is advisable to check the quality of yeast rather than wasting a whole bag of flour.
Milk - For soft buttery and tender rolls, it is always recommended to knead the bread using half (1/2) quantity of milk. This is highly recommended if you are using whole wheat flour to avoid dense rolls. Milk Temperature should be lukewarm.
Water - Should be lukewarm.
For a Vegan Version of this recipe, skip milk and just knead using lukewarm water.
Butter - While Olive Oil can be used for kneading the dough, I prefer butter (salted) especially for garlic bread. It helps in achieving that buttery and soft texture of the bread.
If you are avoiding butter for some reason, use olive oil to knead the dough but don't replace the butter while brushing on top with herbs, fresh garlic and chili flakes.
Herbs - I have used Oregano, Rosemary, Dry Red Chilli Flakes, Basil. All these herbs are dry as I didn't have access to fresh ones. If you grow herbs at home, finely chop them and add.
Fresh Garlic - I know most recipes call for garlic powder but nothing tastes good as the fresh one. I have ground the fresh garlic into a paste so that it easily mixes in the dough and also gets absorbed by the bread with the melted butter and herb mixture.
You can use a variety of herbs for this recipe. If you don't stock herbs separately, try the Italian Pizza seasoning and go crazy!
Variations
Now, pull apart bread can be shaped into a variety of ways. I have experimented with quite a few but I love this one in particular because they are bite size rolls that make a perfect accompaniment for soup.
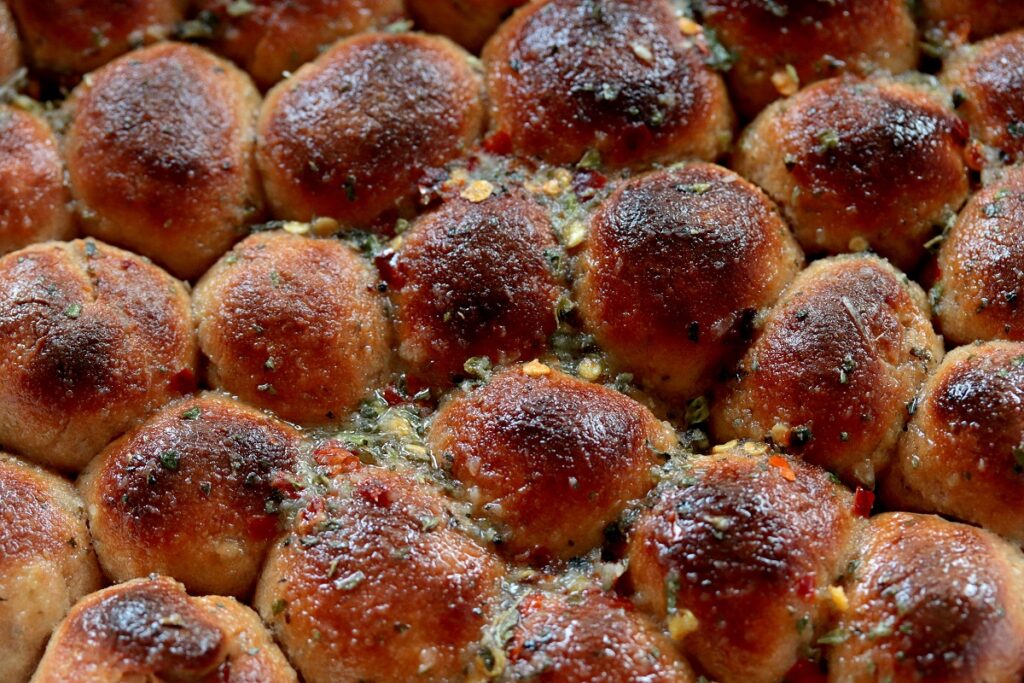
You can also grate some parmesan cheese and turn these into a cheesy garlic pull apart bread too. If you love that stringy cheese texture, add a mix of mozarella and parmesan or cheddar for best results. The kids would be super happy.
Honestly, adults like us can make do without the cheese and settle for the butter instead.
This garlic pull apart bread almost resembles a monkey bread, which was actually my first thought but I didn't have a bundt pan at home so had to make do with the heart shaped cake tin to line the small rolls.
I know most people are not fond of whole wheat bakes because they find it quite dense. It takes a while to understand the ratio of water to flour to nail that beautiful crumb. Once you achieve it, you won't bake with all purpose flour.
Instructions
(1) In a bowl, add 1/2 cup of lukewarm milk, 1 tsp instant yeast and 2 tsp of sugar. Mix gently, cover and allow the yeast to proof. Should take around 5 minutes.
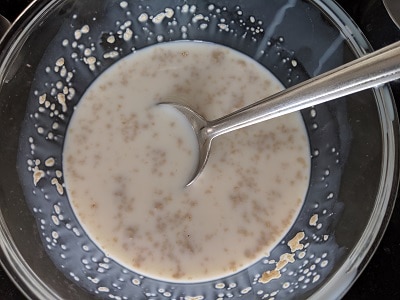
(2) As you can see below, the yeast is fresh (it froths up). If your yeast is not fresh, this will not happen. You will have to discard this mixture and begin the process again using a fresh bowl.
Pro Tip 1 - Always test your yeast (even instant yeast) by proofing them with milk / water especially when you are baking a big batch of bread for the family.

(3) In a wide bowl, add the sifted flour, herbs (basil, oregano, rosemary), salt and 2 tsps of garlic paste.
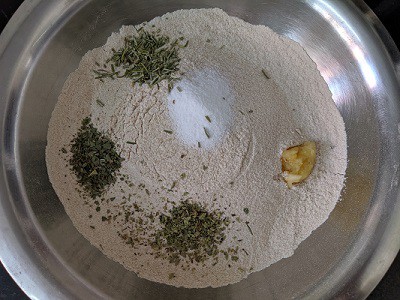
(4) Mix well and add the yeast mixture along with 1/2 cup of lukewarm milk. Knead it gently. Add another 1/4 cup of lukewarm water until the dough is sticky (as seen below)

(5) Add melted butter and knead the dough until it is smooth to touch (as seen below). It will take 3 tbsp of butter to knead 3 cups of flour and the butter should be introduced slowly and only after the water and milk has been used to knead the dough.
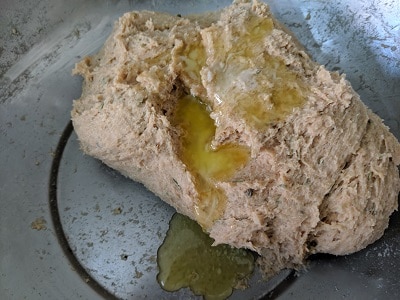

(6) Grease a bowl with some oil or butter and place the well kneaded dough inside to prove. Cover the dough with a lid or damp towel and place it in a warm place to proof. It took 45 minutes for the dough to rise.
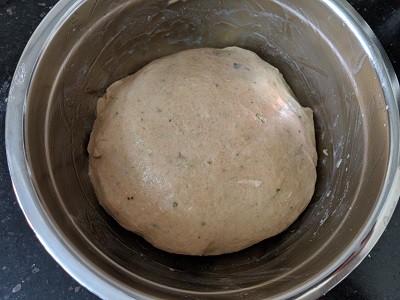
(7) Once the dough rises (as you can see its double in quantity), punch the dough couple of times.
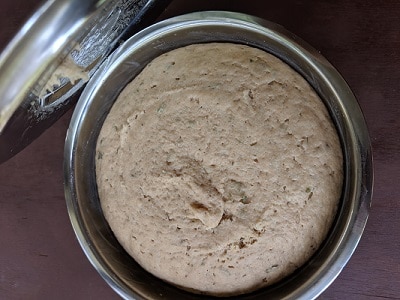

(8) Dust the kitchen counter with some flour and divide the dough into equal portions using a cutter.
(9) Make small rolls of equal size.

(10) Grease a heart shaped tin with some butter and gently place the rolls.
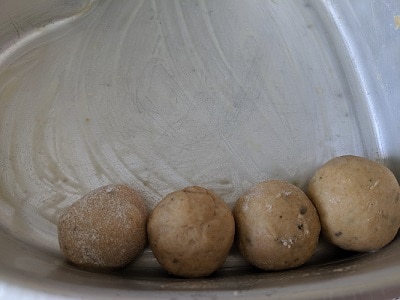
(11) Once the rolls are done, cover the tin with a damp cloth and place it to prove further until double in size.
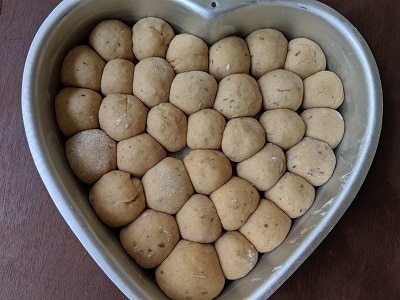
(12) Preheat the oven at 200 Degrees C for 10 minutes.
(13) Place the bread inside after applying some warm milk over the bread using a brush.
(14) Bake the bread for 20 to 25 minutes at 200 Degrees C.

(15) Once the bread is out of the oven and its still hot, prepare a mix of soft butter, herbs and fresh garlic paste.
(16) Using a brush, apply this mix generously over the bread and allow it to soak / absorb all the flavours. Note - Do this while the bread is hot / warm for best results.
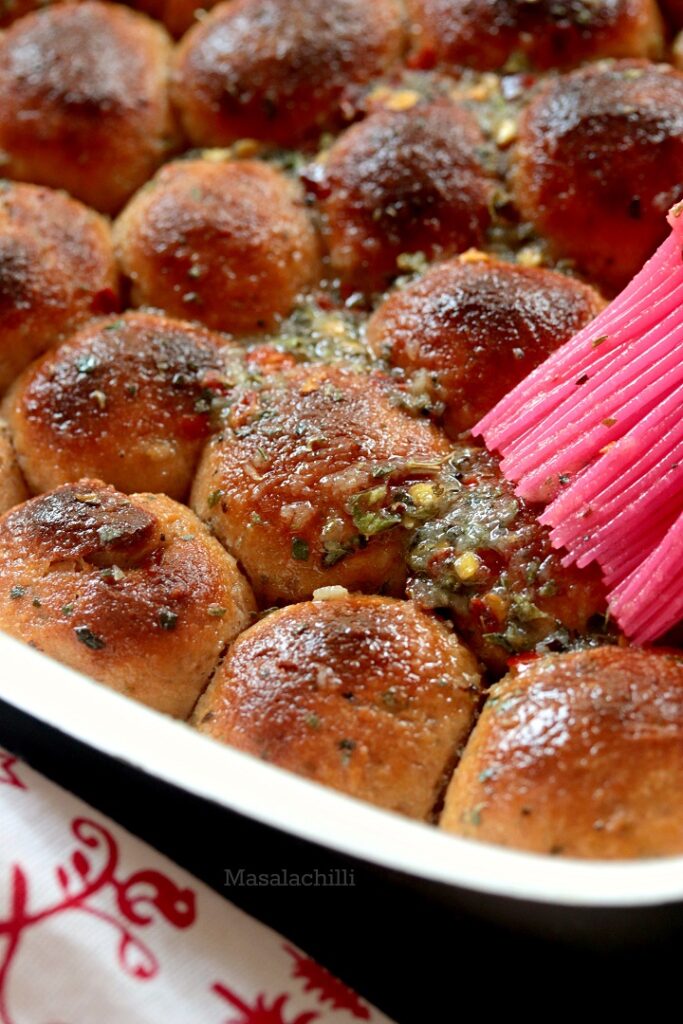
(17) After the above process, de-mould the bread immediately to avoid condensation.
(18) Serve warm as side with soup and salad.
Top Tips to make Best Garlic Pull Apart Bread using whole wheat flour
- The amount of salt added to the bread might seem a little less. Please note we are using salted butter while kneading and also for glaze / brushing the bread, post baking
- Brushing milk on top (before baking and after 2nd proofing) leads to moist bread and prevents the bread from drying in the oven.
- It is ideal to PRE-HEAT your oven atleast for 10 to 15 minutes at 200 degrees Celsius.
- Water quantity for kneading or in this case milk depends on weather conditions and flour. Use your judgement and add while kneading. Never dump the entire amount while kneading. Always measure and keep the ingredients ready to be used.
- Proofing time depends on the weather. In warm and humid climate, the dough will rise faster as compared to cold and wet months.
- It took me 45 minutes for the 1st proofing and another 45 minutes for 2nd time proofing after shaping the dough into rolls. In winters, it does take me a while. Proofing means the dough after kneading should be double in size.
- You can add fresh herbs instead of dry herbs for the recipe.
- Sugar is "yeast's feed" and you don't taste that in your rolls.
- You can replace Emmer wheat flour with All Purpose Flour, Regular Wheat Aata.
- Any cake tin can be used for this recipe. Just ensure the height of the tin is around 2 inches.
- The recipe can be easily doubled for a family of 4. You can just place the rolls one above the other two
- If using cheese for kids, add it along with the butter and herbs or you can simply grate it while the bread is hot from the oven. In that case, you can reduce the amount of butter used in the recipe too.
Serving Suggestions
Soups - Warm Rolls and Soups are perfect combination. Some of our favorites include Broccoli Soup, Sweet Corn Soup, Carrot Ginger Soup, Mushroom Soup, Minestrone Soup or Pumpkin Soup during Fall.
Pasta - Easy weeknight dinners call for bread and pasta. Try this bread with our creamy Vegan Pumpkin Sauce Pasta The pasta is a great way to sneak vegetables in your kids diet. For busy days, a simple Aglio e Olio never fails to impress!
Salads - You can serve this with a side of Strawberry Arugula Salad or Black Bean Mango Salad , Horiatiki Salad (Greek Salad) for summer bbq parties.
Other Bread Recipes to Try
Easy Whole Wheat Bread (for sandwiches)
Please take a moment to LEAVE A COMMENT and a STAR * rating on the blog. It would encourage others to try the recipe or you could TAG US on any of our social media handles –INSTAGRAM, TWITTER, FACEBOOK PAGE AND PINTEREST.

Garlic Pull Apart Bread Recipe (Whole Wheat)
Equipment
- 9 inch Heart Shape Cake Tin (height 2 inches)
- Mixing Bowls - 3 nos.
- Flour Sifter
- Measuring cups and spoons
- OTG for baking
Ingredients
Preparing the Yeast for the Dough
- ½ cup Milk (Lukewarm)
- 1 tsp Instant Yeast
- 2 tsp Sugar
Ingredients for Bread
- 3 cups Whole Wheat Flour
- 1 tsp Dry Basil
- 1 tsp Dry Oregano
- 1 tsp Dry Rosemary
- 2 tsp Garlic Paste
- 1 ½ tsp Salt
- 3 tbsp Melted butter (1 tsp extra to grease the bowl and tin for baking)
- ½ cup Milk (Lukewarm) + extra as required for brushing on the rolls before baking. Read notes below
- ¼ cup Water (lukewarm) read notes
Herbs and Garlic Butter for the Bread
- 1 tsp Oregano
- 1 tsp Red Chilli Flakes
- 1 ½ tbsp Soft Butter
- 2 tsp Garlic Paste
1 cup is 250ml, 1 tbsp 15ml, 1 tsp 5ml
Instructions
- In a bowl, add Ingredients under "Preparing the yeast for the dough" Mix gently, cover and once the yeast froths, keep it aside and proceed with the next step.
- In a wide bowl, add the sifted whole wheat flour, herbs (basil, oregano, rosemary), salt and 2 tsps of garlic paste.
- Mix well and add the yeast mixture along with 1/2 cup of lukewarm milk. Knead it gently. Add another 1/4 cup of lukewarm water until the dough is sticky.
- Add 1 tbsp melted butter and knead the dough until it is smooth to touch (as seen below). It will take 3 tbsp of butter to knead 3 cups of flour and the butter should be introduced slowly and only after the water and milk has been used to knead the dough.
- Grease a bowl with some oil or butter and place the well kneaded dough inside to prove. Cover the dough with a lid or damp towel and place it in a warm place to proof. It took 45 minutes for the dough to rise.
- Once the dough rises (as you can see its double in quantity), punch the dough couple of times.
- Dust the kitchen counter with some flour and divide the dough into equal portions using a cutter. Make small rolls of equal size.
- Grease a heart shaped tin with some butter and gently place the rolls side by side.
- Once the rolls are done, cover the tin with a damp cloth and place it to prove further until double in size.
- Preheat the oven at 200 Degrees C for 10 minutes.
- Place the bread in the oven after applying some warm milk over the bread using a brush. Bake the bread for 20 to 25 minutes at 200 Degrees C.
- While the bread is baking, take a bowl and add all the ingredients under "Herbs and Garlic butter for the bread" and keep aside.
- Once the bread is out of the oven and its still hot, using a brush, apply the butter, herb and garlic mixture generously. Let the bread soak / absorb all the flavours. Note - Do this while the bread is hot / warm for best results.
- After the above process, de-mould the bread immediately to avoid condensation. Serve warm as side with soup and salad.
Notes
- The amount of salt added to the bread might seem a little less since we are using salted butter while kneading and also to brush post baking
- Brushing milk on top (before baking and after 2nd proofing) leads to moist bread and prevents it from drying in the oven.
- It is ideal to pre-heat your oven atleast for 10 to 15 minutes at 200 degrees C.
- Water quantity for kneading or in this case milk depends on weather conditions and flour. Use your judgement and add while kneading. Never dump the entire amount while kneading. Always measure and keep the ingredients ready to be used.
- Proofing time depends on the weather. I live in Mumbai city which is warm and humid for most part of the year.
- It took me 45 minutes for the 1st proofing and another 45 minutes for 2nd time proofing after shaping the dough into rolls. In winters, it does take me a while. Proofing means the dough after kneading should be double in size.
- You can add fresh herbs instead of dry herbs for the recipe.
- Sugar is "yeast's feed" and you don't taste that in your rolls.
- You can replace whole wheat flour with maida or all purpose flour and bake these rolls.
- Any cake tin can be used for this recipe. Just ensure the height of the tin is around 2 inches.
- The recipe can be easily doubled for a family of 4. You can just place the rolls one above the other two
- If using cheese for kids, add it along with the butter and herbs or you can simply grate it while the bread is hot from the oven. In that case, you can reduce the amount of butter used in the recipe too.
Please subscribe to our website to receive all the delicious recipes in your mail box.
We will be back again with yet another exciting recipe .. Until then, stay healthy and happy!
Vidya Narayan
Nice and new type of recipe.
thank you
Looks yummy and the pictures r so good
Hey Neetha, thank a ton dear.
I don't have 250ml cup size how should I measure the ingredients.... M having 200ml cup size
Use the 200 ml cup that you have and follow all the measurements according to that cup size only (including spoons). Hope this helps Pooja. Thank you
i dont have a cake tin, anything else i can use?
Hi Shreya,
You need a baking tin, I am afraid, for trying this recipe. If you try this on a baking tray, the rolls will be flat and not fluffy. Hope this helps.
Wow Vidya pull apart bread looks so tempting. I always make bread with different flavors but never tried like this. Now your pictures tempted me to try. I will try it soon and let you know.
Thank you very much. Glad you liked the recipe.
Hi...I tried this recipe & it’s just amazing.. thanks a ton for sharing
I am so glad to hear your feedback. This is one of my fav bread recipes as well. Glad you feel the same. Cheers!
Hi! Would it be possible to freeze the dough rolls after proofing and bake later(on the next day)?
Hi Rosie,
Yes its possible. After you shape the garlic knots (post first rise or proofing) you can chuck the dough into freezer. Ensure you wrap your dough tightly with a cling film. Next day, allow the bead to proof (2nd time) on your countertop until it is room temperature (the dough will rise slowly) and then bake. If you are baking the next morning, I would recommend transferring your dough from the freezer to your refrigerator the previous night so that it thaws slowly and saves time. Hope this helps.
Hi! The taste is good but my dough didn't rise much at all... Should I increase the quantity of yeast? Baking bread for the 2nd time so not very experienced
Hello Priya, the reason for dough not rising much could be poor quality of yeast. In my opinion, store the yeast in a refrigerator or freezer for better shelf life. Ensure the water is lukewarm while kneading. Hot water kills yeast and another possibility that your dough didn't rise much to your satisfaction. Please do not get discouraged and continue baking. Happy to help. Share photos on my email id [email protected] so I can take a look and help further. Cheers!
Hi. I just found your website. Planning to try this recipe. It's quite detailed. My doubt is so we need to follow window pane test for this dough? I have stopped making breads because I couldn't have knead them for long to pass the window pane test. First time going to try with wheat though. Does this need window pane test?
Hello Nisha, for whole wheat breads, kneading takes time. It takes roughly 10-20 mins for the dough to pass window pane test. It also depends on quality of wheat flour and water quantity. Since you have the fear of baking bread, I would advice you to knead the bread for 10-15 mins, shape, proof and bake. I hope you enjoy the process. Cheers!