
Vendhaya Keerai Kootu is an Easy Wholesome Lunch Recipe with Lentils (Paruppu) and Fresh Methi Leaves. This South Indian Side Dish tastes absolutely great with chapatis and Rice.

I love buying and cooking with leafy vegetables. Methi and Palak tops the list at home. So, when I spotted a fresh bunch of Methi, I decided to cook our favourite Vendhaya Keerai Kootu or the South Indian Methi Dal with coconut for lunch. Served them with Chapati and Carrot Pachadi for a wholesome meal.
Vendhaya Keerai Kootu is a very convenient dish to rustle up and makes a wholesome side dish for anything from breakfast to dinner. The leftovers taste delicious too the next day.
Honestly, when you have Kootu for lunch, you don't have to worry about serving a dry vegetable separately. Kootu is a great side dish for both, rice and chapati.
The combination of lentils, greens and mildly spiced coconut gravy makes it a number one choice at home during weekdays. I either opt for steamed rice or make chapatis to serve with the Kootu.
Some Kootu Recipes that you can try -
- Pudalangai Kootu (Snake Gourd Kootu)
- Kohlrabi Kootu (Nool Kol Kootu)
- Vazhaithandu Kootu (Banana Stem)
- Cabbage Kootu
Vendhaya Keerai Kootu is traditionally made with Toor Dal or Thuvaram Paruppu as its called in Tamil. I, however, prefer Kootu with Yellow Moong Dal or Pasi Paruppu. It is lighter to digest as compared to Toor.
This recipe is quite easy when everything can be dumped in a pressure cooker but I hate overcooking leafy vegetables and try my best to retain the colour.
Never Overcook Leafy Vegetables
I love retaining the vibrant green colour of the leafy greens, which is also quite visible from the photograph below.
For this recipe, I have sauteed the methi leaves in some oil on low heat. The water from the leafy greens is enough to cook it and keep it crunchy, also helping it retain that gorgeous green.

Methi leaves are bitter so choose tender greens instead of the mature ones. Do read some of my tips below to stock, cut and clean methi leaves.
How to cut, clean and store Vendhaya Keerai?
Methi Leaves should never be washed with water unless you plan to cook. It can be carefully wrapped in a paper bag or cloth bag and stored in the refrigerator until you plan to use, say couple of days from purchase.
The stems are not used mostly especially if they are thick. Tender stems can be easily chopped and added to recipes.
Generally the activity of sorting my greens at home are reserved when I catch up on TV shows on Netflix or Prime. I lay down a newspaper on the dining table and get sorting my greens.
I remove the stems and compost them while the leaves are sorted in zip lock bags and stored in the refrigerator until they are ready to cook and that is when I wash them quickly and drain them in a colander. Saves me a lot of time in the morning.
Best Methi or fenugreek leaves is available during winters. In fact all leafy vegetables are best during winters. They taste fresh and crunchy too. Living in Mumbai, we get all these vegetables 365 days in a year so we make the most of it.
Love Methi? Here are some Methi Recipes on the blog -
- Aloo Methi Sabzi (Potato Methi Stir fry)
- Methi Che Ambat Goad Varan (Maharashtrian Methi Dal)
- Methi Thalipeeth (Breakfast recipe with gluten free flours)
- Missi Roti (Masala Roti with Methi)
Vendhaya Keerai Kootu Step by Step Recipe
Wash the methi leaves in a colander (after removing the thick stems) and drain well.

Roughly chop the methi greens and keep it in a bowl aside.

Wash and soak the yellow moong dal or pasi paruppu for atleast 20 minutes.

After 20 minutes, pressure cook the dal with some turmeric powder.
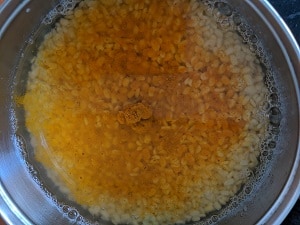
Once the dal is pressure cooked, mash the dal and keep aside.

For the coconut gravy, in a mixer grinder jar, add 1/3rd cup of grated coconut (I have used frozen grated coconut) along with cumin seeds and kashmiri red chillies.

Add some hot water to grind this into a gravy consistency. (Note - Never use room temperature water to grind frozen coconut, it will split). Keep this aside.

Heat a pan, add a tsp of oil and the methi greens.

Saute the methi greens on low flame, cover and cook for few seconds.

The greens should cook and retain its vibrant green colour (as seen below)

Now add the cooked pasi paruppu (yellow moong dal) to the methi.

Then add the coconut gravy paste along with salt to taste.
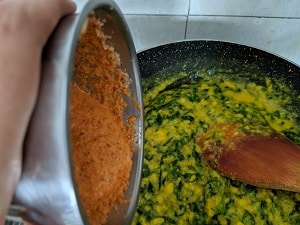
Mix everything well, add the tempering and serve piping hot with chapati or rice.

Recipe Notes
- I have used Kashmiri Red chillies for the coconut gravy and it lends a beautiful colour. It is low on spice as well. You can use any variety of dry red chilli available in your pantry.
- As mentioned above, if you are using frozen coconut, use hot water for grinding the coconut paste. The coconut will not split and separate.
- If you grow methi greens at home and have those tender stems, use them entirely and don't discard the stems. They taste amazing.
- Methi microgreens can also be used for this recipe. Saute them only for a couple of seconds as they cook fast.
- This Kootu recipe can stay fresh in the refrigerator for atleast 48 hours. You can heat small portions in the microwave and serve. Personally, we keep very little leftovers in the refrigerator and it lasts us probably until next day lunch max.

Vendhaya Keerai Kootu (South Indian Methi Dal)
Ingredients
- 3 cups Methi Leaves 1 cup is 250 ml
- 1/2 cup Pasi Paruppu or Yellow Moong Dal
- 1 1/2 cup Water to pressure cook Yellow moong dal
- 1/2 tsp Turmeric Powder or Haldi Powder
- 1 tsp Coconut Oil
- Salt to taste
- FOR THE COCONUT GRAVY
- 1/3 cup Grated Coconut
- 1 tsp Jeera or Cumin Seeds
- 1-2 nos. Whole dry red chillies
- 1/3 cup Hot Water to grind Check notes
- FOR TEMPERING
- 1 tsp Coconut Oil
- 1/2 tsp Urad Dal or Ulatham Paruppu
- 1/2 tsp Mustard Seeds
- 1-2 nos Whole Dry Red chillies
- Curry leaves as required
Instructions
- Wash the methi leaves in a colander (after removing the thick stems) and drain well.
- Roughly chop the methi greens and keep it in a bowl aside.
- Wash and soak the yellow moong dal or pasi paruppu for atleast 20 minutes.
- After 20 minutes, pressure cook the dal with some turmeric powder.
- Once the dal is pressure cooked, mash the dal and keep aside.
- For the coconut gravy, in a mixer grinder jar, add 1/3rd cup of grated coconut (I have used frozen grated coconut) along with cumin seeds and kashmiri red chillies.
- Add some hot water to grind this into a gravy consistency. (Note - Never use room temperature water to grind frozen coconut, it will split). Keep this aside.
- Heat a pan, add a tsp of oil and the methi greens.
- Saute the methi greens on low flame, cover and cook for few seconds.
- The greens should cook and retain its vibrant green colour.
- Now add the cooked pasi paruppu (yellow moong dal) to the methi.
- Then add the coconut gravy paste along with salt to taste.
- Mix everything well, add the tempering and serve piping hot with chapati or rice.
Notes
- I have used Kashmiri Red chillies for the coconut gravy and it lends a beautiful colour. It is low on spice as well. You can use any variety of dry red chilli available in your pantry.
- As mentioned above, if you are using frozen coconut, use hot water for grinding the coconut paste. The coconut will not split and separate.
- If you grow methi greens at home and have those tender stems, use them entirely and don't discard the stems. They taste amazing.
- Methi microgreens can also be used for this recipe. Saute them only for a couple of seconds as they cook fast.
- This Kootu recipe can stay fresh in the refrigerator for atleast 48 hours. You can heat small portions in the microwave and serve.
Tried this recipe? Share it with us! Take a picture and share it via email on [email protected] or you could TAG US on any of our social media handles – INSTAGRAM, TWITTER, FACEBOOK PAGE AND PINTEREST.
Help us Grow! Share the recipe with your family and friends.. Encourage everyone around you to cook at home.
You can also subscribe to our website to receive all the delicious recipes in your mail box.
We will be back again with yet another exciting recipe .. Until then, stay healthy and happy!
Vidya Narayan
Good one
thank you
Great to be able to interact with you here! Thank you for sharing these simple, healthy and traditional recipes.
What is delightful to me is to see more no-onion/no-garlic recipes. The pictures speaks a thousand words and helps me follow your recipe while cooking it.
Hello Sumy,
Welcome to Masalachilli and I am so glad to read all your kind words. I will be adding many more No Onion No Garlic recipes on the blog in the coming days so please feel free to subscribe to our blog so that you can receive the recipes directly in your inbox. If there is anything specific that you are looking for, please reach out to me. Happy to help!
Warm Regards
Vidya